Custom Tracker Rotation Algorithm
SolarFarmer allows you to specify your own rotation angles for trackers - accomplished by the scripting functionality in SolarFarmer.
Requirements
In order to use this functionality you need 2 types of input data:
- The location data for each of the trackers in your site layout
- A time-series data file - each date-time entry containing the rotation angle for each of the trackers in the site.
Plus a PAN file for the module specification, an OND file for the inverter specification and you'll neeed to define a tracker template and a transformer specification.
This mini-tutorial will show you how to add and configure trackers to a site layout, then use the custom rotations angles for visualisation and in the energy calculation.
Tip
Please get in touch (send an email to solarfarmer@dnv.com) if you need assistance as this can be quite complex, especially if you're not familiar with C# scripting.
1. Add Your Trackers To a Site Layout
The first thing you should do is add individual trackers to a site layout from your data file.
Important
It is important that you add the trackers to the site layout using scripting rather than the usual layout tools as you need to give each tracker a unique ID (starting from 0) that are in the same order that the tracker rotations appear in your data file. There is no way to set IDs of trackers through the UI (and it would be very time-consuming for a large number of trackers).
A few useful scripting classes and functions
Before we begin, it's worth bringing to your attention some useful scripting classes and functions that will help you fulfill this task:
| Class/Function | Description |
|---|---|
TrackerInfo |
Encapsulates information about an indidivual tracker taken from the input file (name, ID, north and south locations). You will have to write a function to create these from your input file. |
TrackerGroup |
Represents a group of trackers that share a common X value (typically a north-south row). |
Point3D |
Represents a 3D Point (X, Y and Z coordinates) |
UserLibs.TrackerShared.Utils.CreateAndFillLayoutRegion() |
Creates and fills a layout region with your trackers, adding inverters and strings. |
Toolbox.TrackerImport.GetMinMaxValuesFromTrackers() |
Utility function for getting the min and max X,Y values from all your trackers |
Toolbox.TrackerImport.GenerateTrackerGroupsFromTrackerInfos() |
Utility function for grouping your trackers into north/south rows |
Toolbox.Export.WriteXyzHeightFileFromTrackerInfos() |
Writes an XYZ height terrain file from your tracker locations |
Toolbox.ImportElevationGrid() |
Imports an elevation grid from an XYZ height terrain file |
a) Add the TrackerShared library to your workbook
The CreateAndFillLayoutRegion() function above is a helper function to create and fill a layout region with your trackers. You give it a list of TrackerInfo objects (one for each tracker), plus the various components to use and other parameters (such as string length) and it will do the work for you - adding trackers, a transformer, sufficient inverters, modules and strings.
If you wish to use the CreateAndFillLayoutRegion() function you'll need to add the TrackerShared C# user library to your workbook. To do this:
- Open the Scripting Editor and click on the 'Import Scripts from Files' button.
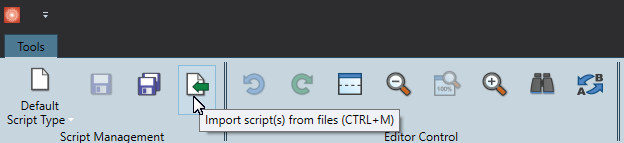
- Find the folder you installed SolarFarmer and select the file
"C:\Program Files\DNV\SolarFarmerversion number\Scripts\Trackers\TrackerShared.cslib" - The 'TrackerShared' User Library script should be loaded into the workbook and appear on the left-hand side. You don't need to look at the contents (but it is recommended if you want to learn!).
b) Read tracker information from a file
The example assumes the tracker information (their geographical locations) comes in a CSV file with the following 7 column headers:
Name, X (north), Y (north), Z (north), X (south), Y (south), Z (south)
followed by one row for each tracker.
It is important that the X and Y coordinates of the trackers are in metres and are in the same projection (e.g. UTM Zone 30) as the projection in your workbook.
Create a new script (default type) and use the supplied UserLibs.TrackerShared.IO.ReadTrackerCoordinates() function to read the file:
// Read the tracker coordinates from the csv file
List<TrackerInfo> trackerInfos = UserLibs.TrackerShared.Utils.ReadTrackerCoordinates(csvFilePath);
This gives you a list of TrackerInfo objects, one for each tracker.
Note
If your input file is in a different format to the example you will need to copy the ReadTrackerCoordinates() function code, paste it to your own script and customise it for your specific file format. Make sure that the IDs given to the TrackerInfo objects start from 0 and increment by 1 for each subsequent tracker.
c) Create an .xyz terrain file and import it
If you have specific tracker locations (including the height) you may not have specific terrain files to go with them. They probably won't align properly with the default SRTM terrain. Instead you can generate an .xyz file (a file containing a list of x, y, z positions that SolarFarmer can read in and generate terrain from). The utility function Toolbox.Export.WriteXyzHeightFileFromTrackerInfos() is provided for you to do this. The function Toolbox.ImportElevationGrid() can then be used to import it into the workbook.
const string xyzHeightFilePath = @"C:\Data\TerrainFromTrackers.xyz";
const double trackerHeightFromGround = 2.0;
const double marginAroundTrackerExtentsInMetres = 50;
// Create an .xyz file from the tracker coordinates (north and south positions)
Toolbox.Export.WriteXyzHeightFileFromTrackerInfos(xyzHeightFilePath, trackerInfos, trackerHeightFromGround, marginAroundTrackerExtentsInMetres);

// Import this .xyz terrain file into the workbook
Toolbox.ImportElevationGrid(xyzHeightFilePath, Workbook.Domain.Geography.WorkbookProjection);
d) Create and populate a new layout region
Important
Before being able to add new trackers, inverters and modules to your site layout you will need to define their specifications in your SolarFarmer workbook. Do this now.
- If not already done, set the site's location (and map projection) in the workbook for the site.
- Import a PAN file
- Import an OND file
- Define a tracker template that is the same size and dimensions as the one in your input file
- Define a transformer
The following code snippet selects the module, inverter, tracker template and transformer specifications to use in the layout region, then fills it with the trackers, adds a transformer and assigns inverters and strings.
// Create a new layout region and use generic layout to fill it.
SiteLayout siteLayout = Workbook.Domain.VisibleSiteLayout;
ModuleSpecification moduleSpecification = Workbook.ComponentLibrary.ModuleSpecifications.First();
InverterSpecification inverterSpecification = Workbook.ComponentLibrary.InverterSpecifications.First();
TrackerSystemSpecification trackerSystemSpecification = Workbook.ComponentLibrary.TrackerSystemSpecifications.First();
TrackerTemplateSpecification trackerTemplateSpecification = Workbook.ComponentLibrary.TrackerTemplateSpecifications.First(t => t.TrackerSystemSpecification == trackerSystemSpecification);
TransformerSpecification transformerSpecification = Workbook.ComponentLibrary.TransformerSpecifications.First();
const int stringLength = 29;
const double dcAcRatio = 1.2;
const double Uc = 31.0; // (constant heat transfer)
const double Uv = 1.6;  // (convective heat transfer)

UserLibs.TrackerShared.Utils.CreateAndFillLayoutRegion(
    trackerInfos,
    siteLayout,
    stringLength,
    dcAcRatio,
    Uc,
    Uv,
    moduleSpecification,
    inverterSpecification,
    trackerTemplateSpecification,
    transformerSpecification);
At this point, when you run the script you should see a layout region filled with the trackers from your input file. Each tracker should be placed on a row, inverters should be added and strings should be placed on the trackers. View the site in 3D to see how it looks.
2. Read and Use the Tracker Rotations
The trackers are now laid out on the site. The next thing is to read in the tracker rotation values and use these in a tracker position algorithm script (rather than using the default SolarFarmer tracking algorithm).
There are a couple of scripting classes that are relevant:
| Class | Description |
|---|---|
TrackerRotationsTimeStep |
A timestamp and an array of tracker rotations (one for each tracker) for that timestamp |
TrackerRotations |
A list of tracker names and a list of timestamps for those trackers throughout the year |
This example assumes that you have one or more CSV files containing the tracker rotation information with the following column headers:
Year,Month,Day,Hour,Minute,Second,Azimuth,Zenith,Tracker0,Tracker1,Tracker2,...
There should be a column for each of the trackers.
Important
The columns of the tracker rotations should be in the same order that the trackers appear in the original CSV file containing their locations. If not, the trackers will use the wrong rotation angles. It is up to you to make sure the order is the same.
Each subsequent row contains a date/time and the rotation information for each of the trackers.
The UserLibs.TrackerShared.Utils.ReadAllTrackerRotationsFromFilesInFolder() function does this for you. If your data files differ from this format, please copy the code and create your own script function to do this.
const string folderPathContainingTrackerRotationFiles = @"C:\Data\TrackerRotationsFolder\";
TrackerRotations trackerRotations = UserLibs.TrackerShared.Utils.ReadAllTrackerRotationsFromFilesInFolder(folderPathContainingTrackerRotationFiles);
a) Create a new tracker position algorithm script
In the drop-down in the top-left of the Script Editor, choose 'Tracker Position Algorithm Script Type' and press the button to add a new one of that type. (Here, 'tracker position' is used instead of 'tracker rotation', but they mean the same thing).
The new script should be filled with the following template script (for you to customise):
/// <summary>
/// TODO: Rename the class and describe here what it does.
/// </summary>
[DisplayName("<TODO: put display name here>")]
[Description("<TODO: put description here>")]
public class MyTrackerPositionAlgorithm : CustomDateTimeTrackerPositionAlgorithmBase
{
    /// <summary>
    /// Initialises this algorithm.  Sets the tracker count and the time steps and tracker rotations.
    /// </summary>
    /// <returns><c>true</c> if no errors occur during initialisation; otherwise <c>false</c>.</returns>
    public override bool Initialise()
    {
        // Put any initialisation code here (it is run once before the main calculation).
        // Typically reading in the tracker rotations from a file.


        // 1. Call SetTrackerCount() to set the tracker count.
        // TODO: Set the tracker count with the real number of trackers
        this.SetTrackerCount(0);


        // 2. Then call AddTimeStep() multiple times to add a time step along with rotations for each tracker.
        // TODO: Remove this line and call AddTimeStep multiple times with your own data - typically in a loop from the data read in from a file.
        //       There should be one rotation angle per tracker.
        //       Rotations are in degrees.
        this.AddTimeStep(new DateTime(), new List<double> { 45.2, 48.9, 51.4 });


        // 3. Return an appropriate value
        // TODO: Return false if there are any errors (make sure to log the errors).
        //       Return true if all ok.
        return true;
    }
}
b) Set the display name, description and class name
- Add a summary comment to describe what the class does
- Set a display name in the
DisplayNameattribute (this will appear in the Tracker Specification screen to choose from) - Add a description in the
Descriptionattribute (appears as a tooltip for this script in the Tracker Specification screen) - Give the class a unique name
c) Fill in the Initialise() function
- Read tracker rotations in from a file
- Call
SetTrackerCount()with the number of trackers - Add all the timesteps - call
this.AddTimeStep()for each timestep. For each timestep there should be an entry (and in the same order) for each tracker in the array of tracker rotations you provide. - Return true if all ok.
Here is an example:
/// <summary>
/// Custom tracker rotation algorithm.
/// </summary>
[DisplayName("Demo custom tracker algorithm")]
[Description("A demo custom tracker algorithm")]
public class DemoCustomTrackerAlgorithm : CustomDateTimeTrackerPositionAlgorithmBase
{
    /// <summary>
    /// Initialises this algorithm.
    /// </summary>
    /// <returns><c>true</c> if no errors occur during initialisation; otherwise <c>false</c>.</returns>
    public override bool Initialise()
    {
        // 1. Read the tracker rotations in from files in a folder
        const string folderPathContainingTrackerRotationFiles = @"C:\Data\TrackerRotationsFolder\";
        TrackerRotations trackerRotations = UserLibs.TrackerShared.Utils.ReadAllTrackerRotationsFromFilesInFolder(folderPathContainingTrackerRotationFiles);

        // 2. Call SetTrackerCount() to set the tracker count.
        this.SetTrackerCount(trackerRotations.TrackerNames.Length);

        // 3. Then call AddTimeStep() multiple times to add a time step along with rotations for each tracker.
        //    There should be an entry (and in the same order) for each tracker in the float array of tracker rotations.
        foreach (TrackerRotationsTimeStep timeStep in trackerRotations.TimeSteps)
        {
            this.AddTimeStep(timeStep.Time, timeStep.TrackerRotations);
        }

        // 4. Return an appropriate value
        //    Return true if all ok.
        return true;
    }
}
d) Compile the custom script
- Press the 'Compile Script' button to compile your custom script to make sure it successfully compiles.

- Fix any errors before continuing.
e) Select the algorithm in the Tracker System Specification Task
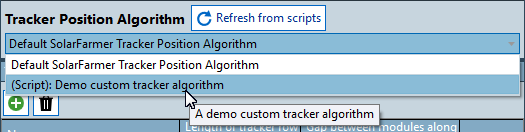
- In the main SolarFarmer application window, go to the Tracker System Specification task (Trackers).
- In the 'Tracker Position Algorithm' section press on the 'Refresh from scripts' button.
- Open the dropdown and you should see your new custom algorithm listed. Select it.
f) Review the algorithm using the Review Trackers task.
- Go to the Review Trackers task
- Change the view to 3D and review the behaviour of your trackers using the custom algorithm.
Make sure that the data files contaning the tracker rotations are present in the expected location (that you specified in the script) and that you set the date to be within the range in your time-series files.
g) Skip writing the Module Performance Log time-series file for large sites.
- If you have chosen to save the time-series files when running the energy calculation (see Setup Yield Calculation) the Module Performance Log file (see Time-Series Results Files) can get extremely large for larger sites. To save memory and disk space it is recommented to skip writing this file (as it is not as frequently used as the other files).
- To do this:
- Create a new default script in your workbook
- Paste the following in the
Execute()function:Workbook.CalculationSettings.SkipWritingModulePerformanceOutput = true; - Run the script (you only have to run this once, as long as you save the workbook after running it).
- Save the workbook.
- This will set this parameter to true for this workbook and will prevent it saving the "Module Performance log for Chunk n.tsv" file to disk when the calculation is run.
- To do this:
h) Run the Energy Calculation
Your custom tracker algorithm will be used for the trackers that use the tracker system specification that you chose the custom script.