Optimisation
You can optimise your site layout by using scripting in SolarFarmer. The parameters that are varied (e.g. pitch, tilt, DC/AC ratio) are up to you, and how you interpret the results is also up to you (the most optimal site may not be the one that produces the most energy).
Requirements
You need an existing SolarFarmer workbook, with racks/trackers already defined and set up, ready to lay out a site and run the energy calculation.
This mini-tutorial will show you how to sweep through various parameters to define multiple site layouts. Then, after running the energy calculation for each site layout (saving the results for each one), analyse and compare the result files.
1. Prepare your SolarFarmer workbook
This assumes you have an existing SolarFarmer workbook that you have set up and is ready to run a calculation. The workbook should include:
- The site location (and the projection is set)
- A solar resource
- A module specification, inverter specification, transformer specification and a rack or tracker specification.
- Ideally one or more initial layout regions that you plan on filling.
- All other parameters (albedo, calculation parameters) have been set, ready to run the energy calculation.
2. Add the ResultsShared user library to your workbook
A couple of helper functions are provided to help you work with the results. These are in a C# User Library file (*.cslib) provided with the installer.
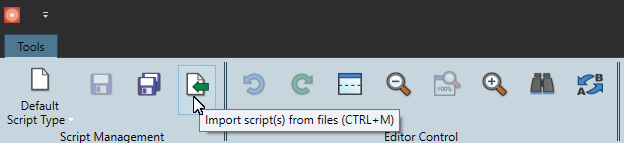
- Open the Scripting Editor and click on the 'Import Scripts from Files' button:
- Find the folder you installed SolarFarmer and select the file
"C:\Program Files\DNV\SolarFarmerversion number\Scripts\Results\ResultsShared.cslib" - The 'ResultsShared' User Library script should be loaded into the workbook and appear on the left-hand side. You don't need to look at the contents.
3. Write a script to generate multiple site layouts
This assumes you wish to do a parameter sweep of certain parameters to generate new site layouts using those parameters. We will do this using a script, sweeping through different values for pitch and tilt for a fixed-tilt system. An example is given here that you can copy and adjust.
For this mini-tutorial we will use a simple workbook (not provided) using fixed-tilt racks.
- In the scripting editor, create a new script (default script type) and copy and paste the following code snippet:
/// <Summary>
/// The main entry point of the script.
/// </Summary>
public void Execute()
{
    // Set the parent folder to store all the results and create it
    const string parentResultsFolderPath = @"C:\Temp\Results";
    Directory.CreateDirectory(parentResultsFolderPath);

    // Delete all but the first site layout in the workbook then get a reference to the first
    // site layout; its layout regions will be used in the new site layouts
    DeleteSiteLayouts(Workbook.Domain.SiteLayouts, 1);
    SiteLayout templateSiteLayout = Workbook.Domain.SiteLayouts.First();

    // Set a results folder to store this run of optimisations (uses the current date and time
    // as the folder name).
    // Set 'SaveResultFiles' to true to make sure the calculation saves all the result files.
    string resultsFolderPath = UserLibs.ResultsShared.Utils.CreateResultsFolderFromCurrentDateAndTime(parentResultsFolderPath);
    Workbook.CalculationSettings.ResultFilesFolder = resultsFolderPath;
    Workbook.CalculationSettings.SaveResultFiles = true;

    // Create a GenericLayoutSettings object that will be used to create new site layouts.
    // You can customise the parameters of this in the function that it calls.
    GenericLayoutSettings genericLayoutSettings = CreateGenericLayoutSettings();

    // Get a reference to the fill option that will be modified in the loops below
    GenericLayoutFillOption fillOption = genericLayoutSettings.AreaLimitation.LimitToAllLayoutRegionsFillOption;

    // This is the main looping bit.  Loop through different pitches and tilts
    for (double pitch = 10; pitch <= 15; pitch += 5)
    {
        for (double tilt = 20; tilt <= 30; tilt += 10)
        {
            // Set the pitch and tilt in the generic layout fill option
            fillOption.IndividualComponentsOptions.RackLayoutOptions.Pitch = pitch;
            fillOption.IndividualComponentsOptions.RackLayoutOptions.Tilt = tilt;

            // Create a unique site layout name - based on the pitch and tilt values
            string siteLayoutName = string.Format("Pitch={0}, Tilt={1}", pitch, tilt);

            // Use generic layout to create a new site layout based on the first site layout
            // using the specified generic layout settings to fill it with racks, and add
            // and string new inverters
            if (Toolbox.GenericLayout.CreateNewSiteLayoutFromExisting(templateSiteLayout,
                                                    genericLayoutSettings, siteLayoutName))
            {
                Toolbox.Log("Created new site layout: " + siteLayoutName);

                // Run the energy calculation using this site layout (which will be the last
                // site layout in the list)
                SiteLayout lastSiteLayout = Workbook.Domain.SiteLayouts.Last();

                // Set the visible site layout to the newly created one, so that the visuals
                // are updated
                Workbook.Domain.VisibleSiteLayout = lastSiteLayout;

                Toolbox.Log(string.Format("Running the energy calculation on site \"{0}\"", siteLayoutName));
                EnergyYieldCalculationScenario scenario = Toolbox.ExecuteEnergyCalculation(
                    siteLayoutName,
                    Workbook.CalculationSettings.SolarResource,
                    lastSiteLayout,
                    Workbook.CalculationSettings.HorizonData);

                // The results of this energy calculation will be stored in a subfolder in the
                // Workbook.CalculationSettings.ResultFilesFolder. The subfolder name is set
                // to be "<workbookname> - <site layout name> (<current date and time>)"
            }
            else
            {
                Toolbox.Log(string.Format("Did not successfully create new site layout: \"{0}\"",
                    siteLayoutName), LogLevel.Error);
            }
        }
    }
}

private GenericLayoutSettings CreateGenericLayoutSettings()
{
    GenericLayoutSettings genericLayoutSettings = new GenericLayoutSettings();

    // Get the fill option
    // You MUST add it to the FillOptions collection, otherwise you can't add it to the
    // area limitation
    genericLayoutSettings.FillOptions.Add(GetFillOption());

    // Set up the area limitation to be limit to all layout regions
    genericLayoutSettings.AreaLimitation.LimitToAllLayoutRegionsFillOption = genericLayoutSettings.FillOptions.First();
    genericLayoutSettings.AreaLimitation.AreaLimitationType = AreaLimitationType.LimitByAllExistingLayoutRegions;

    // Set the electrical limitation to be none - so just limited by the area of the
    // layout regions
    genericLayoutSettings.ElectricalLimitation.ElectricalLimitationType = ElectricalLimitationType.None;

    return genericLayoutSettings;
}

private GenericLayoutFillOption GetFillOption()
{
    GenericLayoutFillOption fillOption = new GenericLayoutFillOption();

    // Set the fill options type to use individual components
    fillOption.FillOptionsType = FillOptionsType.UseIndividualComponents;

    // Set the component options
    FillOptionComponentOptions componentOptions = fillOption.IndividualComponentsOptions.ComponentOptions;
    componentOptions.InverterSpecification = Workbook.ComponentLibrary.InverterSpecifications.First();
    componentOptions.ModuleSpecification = Workbook.ComponentLibrary.ModuleSpecifications.First();
    componentOptions.UseDefaultStringSize = true;
    componentOptions.DcAcRatio = 1.0;
    componentOptions.StringPattern = StringPatternType.Straight;

    // Set the layout choice type
    fillOption.IndividualComponentsOptions.LayoutChoiceType = LayoutChoiceType.FixedTiltRacks;

    // Set the rack layout options (some of these may be overwritten by later parts of
    // the script)
    FillOptionRackLayoutOptions rackLayoutOptions = fillOption.IndividualComponentsOptions.RackLayoutOptions;
    rackLayoutOptions.RackSystemSpecification = Workbook.ComponentLibrary.RackSystemSpecifications.First();
    rackLayoutOptions.Azimuth = 180.0;
    rackLayoutOptions.Tilt = 35.0;
    rackLayoutOptions.Pitch = 7;
    rackLayoutOptions.FillOptionsSpacingType = FillOptionsSpacingType.Pitch;

    return fillOption;
}

/// <summary>
/// Delete all site layouts from the list - keeping the specified number at the start.
/// </summary>
/// <param name="siteLayouts">The list of site layouts to remove from.</param>
/// <param name="numberOfSiteLayoutsToKeepFromStart">The number of site layouts to keep
/// (from the beginning of the list)</param>
private void DeleteSiteLayouts(IList<SiteLayout> siteLayouts, int numberOfSiteLayoutsToKeepFromStart)
{
    while (siteLayouts.Count >= (numberOfSiteLayoutsToKeepFromStart + 1))
    {
        siteLayouts.Remove(siteLayouts.Last());
    }
}
- Change the location of the
parentResultsFolderPathstring constant at the top to an empty folder on your PC. This is where the results will be saved. - The example code assumes you have one existing fixed-tilt site layout, containing at least one layout region.
- The code loops through pitch values of 10m and 15m, and through tilt values of 20 and 30 degrees.
- For each of the combinations:
- It creates a new site layout (using the parameter values to name it uniquely) and adds the site layout to the workbook
- It runs the energy calculation (using the current settings in your workbook) using this new site layout
- It saves the result files to a subfolder within the parent results folder
Results
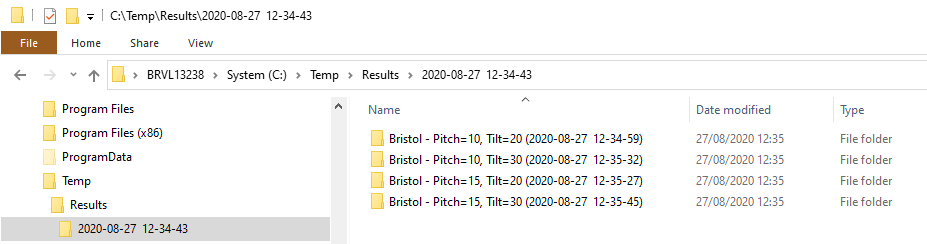
Once you have run the script, a new parent folder (named with the current date and time) should have been created. Then inside that, 4 sub-folders - each containing the results of running one of the energy calculations. The folder name is set to be "<workbookname> - <site layout name> (<current date and time>)".
If you take a look inside one of these folders you can see the various result files that are saved out:
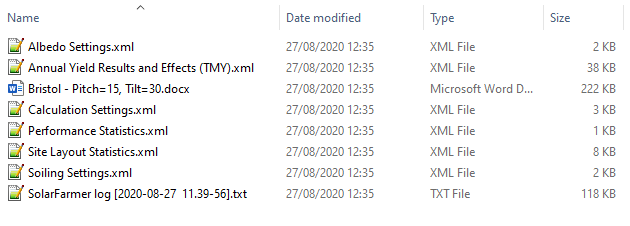
These include the calculation results and effects, along with various settings, statistics, a Word report and the latest SolarFarmer log file.
You will also see 4 new site layouts in the workbook in SolarFarmer. These are the ones that were generated. You can then delete the site layouts you want to discard and continue with those that you want.
4. Summarise the results
Going through all the result files individually is very time-consuming. All the information is there, but you need a simple way to compare the various results together.
There is a utility function (in the ResultsShared user library) called SummariseResultsToTsv(), This takes the parent result folder (the one with the date and time as the name) and iterates through the results in all the subfolders in this parent folder.
For each result, it adds in as a row (or column) in a summary TSV file. Then saves the TSV file.
- Create a new script and copy and paste the following code snippet to try this (it will use the current results folder set in the workbook - you can always hard-code it to the one you want):
/// <Summary>
/// The main entry point of the script.
/// </Summary>
public void Execute()
{
    // Go through all the results - summarising them to two TSV files:
    //  - "Results (row per result).tsv"
    //  - "Results (column per result).tsv"
    UserLibs.ResultsShared.Utils.SummariseResultsToTsv(Workbook.CalculationSettings.ResultFilesFolder);
}
- Run this script
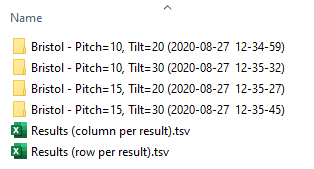
Two .tsv files should be generated in results folder:
- Open the
Results (row per result).tsvfile in Excel
 (click to enlarge)
You can see the different layouts, along with various parameters such as Energy Yield, Performance Ratio, Near shading effect, etc. You can then sort and order them in Excel depending on what you're looking to optimise.
Note
Get in touch (send an email to solarfarmer@dnv.com) if you need more assistance with this feature as it can be quite complex and setting some of the other parameters in the generic layout can be tricky.